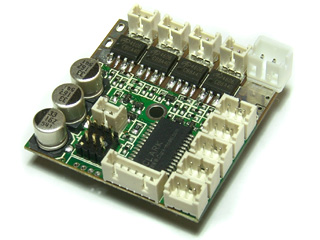
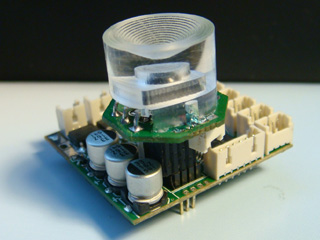
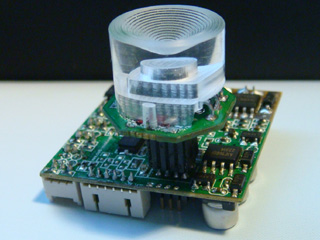
CENTRAL and SPEED
CONTROLLER: functions similar to ESC and motherboard for LNS and DBF
Overview
CSC controller uses max. of
4 channels to control R/C tank's forward/backward movement, sharp turning,
pivoting, turret rotation and gun barrel evaluation at variable speed
Miniature design(30mm X
30mm) for small scale (1/25, 1/35 ,1/48 and etc.) R/C Tank Auto cutoff protects
Li-Polymer battery from over discharged
Safety shutoff prevents
unwanted movement while signal lost
Status
LED indicates
Controller operating status
Easy installation
To control Light and Sound
module and DBF module
DBF data build-in
Top and bottom Dual DBF RX
connector Mounting hole in center of
controller
Auto R/C Control signal detection, support
and system High Resolution Mixer
Tank Personalization
Extended Tank Personalization Status read out and IR
battle test via SONY TV remote
Variants
Part Number
Application
CSCII-5CH-V
-2-Cell
Li-Polymer or 6 Cell NI-CD operation for best performance,
-Support TAMIYA and VSTANK
RC tank IR battle,
-For 5-CH RC system and control mode,
Discontinued,
no more update in future
CSCII-5CH-T
-2-Cell
Li-Polymer or 6 Cell NI-CD operation for best performance,
-support
TAMIYA 1/16 and TAMIYA 1/35
R RC tank IR battle
-For 5-CH RC system and
control mode,
Discontinued,
no more update in future
CSCII-4CH-V
-2-Cell
Li-Polymer or 6 Cell NI-CD operation for best performance,
-SupportVSTANK
RC tank IR battle,
-For4-CH RC system and
control mode,
-ESC slow ramp up and ramp
down
CSCII-4CH-T
-2-Cell
Li-Polymer or 6 Cell NI-CD operation for best performance,
-Support
TAMIYA 1/16 and TAMIYA 1/35
R RC tank IR battle,
-For4-CH RC system and
control mode,
-ESC slow ramp up and
ramp down
CSCII-7CH-T
-2-Cell
Li-Polymer or 6 Cell NI-CD operation for best performance,
support
TAMIYA ----support
TAMIYA 1/16 and TAMIYA 1/35
R RC tank IR battle
-For 7-CH RC control Mode(
Please refer to TX-1 for detail )
-ESC slow ramp up and ramp
down
-Extended
Tank Personalization function is reduced
-Best for modern tank
Kit contained controller*1,
Quick holder *1, preassembled Battery Cable *1, Control Cable *5 and Motor Cable
*4
CSCII and CSC comparison
Part No \ Feature
DBF connector
Mounting hole
CSC
Bottom
No
CSCII
Top and
Bottom
Yes
i
Control Mode and operation
4-CH Control Mode:
Cannon elevation
Booming Cannon
Fire
MG
Head light and tail light on and off control:
Head light on -> Tail light on -> Head light
off -> Tail light off
AUX light control on and off, for example, laser pointer
Tank move forward and backward
Right and Left turn
Turret
rotation
5-CH Control
Mode:
Cannon evaluation: Move the right stick up or down
to raise or lower the cannon.
Booming Cannon:
Push safety button,
Move left stick to left
Fire MG:
Push safety button,
Move left stick to right
A quick push on safety button to enter or exit light control mode ,
when CSCII is in light control mode, DBF RX lens is
turned to purple, than you can move left or Right stick to tune right on( move
stick ) or off( move stick again).
7-CH Control
Mode:
Cannon elevation
Booming Cannon
Fire MG
Head light, tail light,
side mark, AUX light and rotating light on and off
Voice 1,2,3,4 and 5 on
and off
Tank move forward and backward
Right and Left turn
Turret rotation
F/W
Release History
4-CH RC Mode version:
Release
Release date
Release Note/ Major
improvement/status
MK1
Feb,2012
1. Support TAMIYA 1/16 and TAMIYA 1/35 IR
Battle
2. Support 4-CH
system, no modification to transmitter is required to operate all functions
3. ESC slow ramp up and
ramp down
4.
Extended
Tank Personalization function is reduced
5-CH RC Mode version::
Release
Release date
Release Note/ Major
improvement/status
MK-1
2008
1st F/W release for CSCII
MK-2
Mid,2009
1. High Resolution Mixer
2. Tank Personalization
MK-3
Oct,2010
1. Support
VStank IR battle protocol
2. DBF 2.0 standard.
3.
Extended
Tank Personalization
MK-4
Feb,2011
1. Support
External ESC
MK-5-V(5CH-V)
Sep,2011
1. Support
TAMIYA 1/16 and VSTank IR battle
MK-5-T(5CH-T)
Sep,2011
1. Support TAMIYA 1/16 and TAMIYA 1/35 IR
Battle
7-CH RC Mode version:
Release
Release date
Release Note/ Major
improvement/status
MK1-T
Jan,2012
1. Support TAMIYA 1/16 and TAMIYA 1/35 IR
Battle
2. Support 7-CH PPM system(
Please refer to TX-1 for detail )
3. ESC slow ramp up and
ramp down
4.
Extended
Tank Personalization function is reduced
All CSC can receive F/W
upgrade with FREE of charge
Accessories Information
Part Number
Application
Control Cable
To wire Servo control signal form Receiver
to
controller
Battery Cable
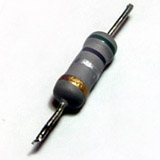
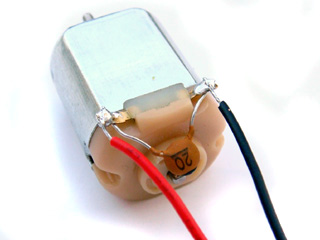
To wire Battery power form Battery to ESC.
Max. Current is 1.0A
Note 1: Wire a
cement power resistor with motor in series to avoid ESC overloading and motor
overheating
Note 2: wire a 20p ceramic capacitor on leads of Motor for
noise filtering
Assembly Guide:
Refer to wiring
table shown below,
connect ,Rudder(CH1),
Throttle(CH2),
Gun barrel
evaluation (CH3),
Turret Rotating
(CH4) and Safety Button(CH5
)connector to
Receiver by
preassembledControl Cables.
CSC has BEC, no extra receiver battery is needed. just remove control cable for
the functions that you don't need it
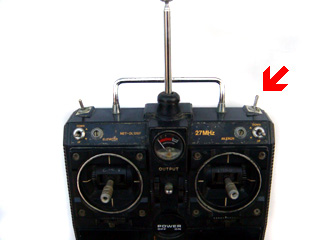
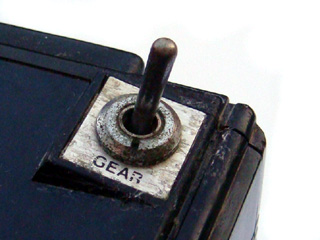
To use upgraded FUTABA SKYSPORT 4 for
Safety Button of firing control,
If using plan remote system, gear control on it can acts as
Safety Button of firing control, no modification is needed
First turn off your
transmitter, than connect battery pack via Battery Cable,
Red wire of Battery Cable
is + pole and Black is - pole.
If powering is in good state, Red status LED will be lit.
Turn on your transmitter,
Red status LED will be
turned off if radio control
signal was received correctly by
CONTROLLER.
If Red status LED is sill On,
Check that your transmitter and
receiver are operating on the same frequency and check the polarity and
integrity of receiver channel signal cable connections. If Red status LED
is flickering, that means poor or weak signaling, pull out transmitter
antenna or adjust Receiver antenna layout.
At first time installation,
repeat previous 2 steps to make sure connection between battery, receiver and
controller are stable and correctly,
than proceed next steps.
Turn off transmitter
and disconnect battery pack form controller,
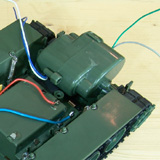
solder
preassembled
ESC1,ESC2 and ESC4 cable to left, right track and turret rotation driving
motors.
Turn on transmitter,
than connect battery pack to controller, Red
status indicator should be lit on and turned off instantly because controller
was powered than receive control signal correctly. Adjust throttle, Rudder
and
Turret Rotation
channel trimmer on transmitter till
all motor was stopped and no hum sound was heard.
KeepRudder channel
stick in natural status
and move
Throttles
channel stick forward or backward,
the tank should move forward or backwardly.
if
pivoting
occurred, find out the motor which is turning in
wrong direction and
reverse its motor cable.
Adjust Rudder trimmer
if tank can
not go straight.
Connector
Description
(4-CH Mode)
Description
(5-CH Mode)
Description
(7-CH Mode)
CH1
Steering control signal
Steering control signal
7-CH PPM signal
To
CH1 on Receiver
To
AILE on Receiver
CH2
Throttlecontrol signal
Throttlecontrol signal
N.C.
Wire to
CH2 on Receiver
Wire
to
ELEV on Receiver
CH3
Gun barrel
evaluation ESC
control signal
Gun barrel
evaluation ESC
control signal
N.C.
Wire to
CH3 on Receiver
Wire to
THRO on Receiver
CH4
Turret rotation
control signal
Turret rotation
control signal
N.C.
Wire to
CH4 on Receiver
Wire to
RUOD on Receiver
CH5
N.C.
Firing
control system control signal
(Safety Button)
N.C.
Wire to
CH5 on Receiver
Wire to
GEAR on Receiver
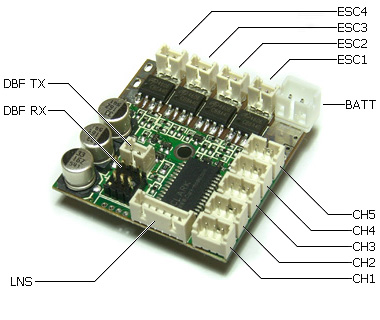
DBF TX
DBF Transmitter connector
DBF Transmitter connector
DBF Transmitter connector
Connect to DBF Transmitter
Connect to DBF Transmitter
DBF RX
DBF Sensor connector
DBF Sensor connector
DBF Sensor connector
Connect to DBF Sensor
Connect to DBF Sensor
LNS
LNS connector
LNS connector
LNS connector
Connect to LNS
Connect to LNS
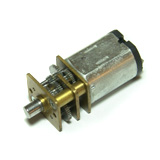
ESC1
Left track ESC connector
Left track ESC connector
Left track ESC connector
Connect to Motor
Connect to Motor
ESC2
Right track ESC connector
Right track ESC connector
Right track ESC connector
Connect to Motor
Connect to Motor
ESC3
Gun barrel
evaluation ESC connector
Gun barrel
evaluation ESC connector
Gun barrel
evaluation ESC connector
Connect to Motor
Connect to Motor
ESC4
Turret Rotating
ESC connector
Turret Rotating
ESC connector
Turret Rotating
ESC connector
Connect to Motor
Connect to Motor
BATT
Battery
connector
Battery
connector
Battery
connector
Connect to Battery
Connect to Battery
Top
View
Bottom View
Tank Personalization:
Behavior or
Settings of CSCII, includes Type of Tank, Mode of Mixer,
Strength of Recoil and Strength of Jerk
can be
reprogrammed to meet different requirement and different application.
Type of Tank
determines
Battle Date when doing IR battle,
Type of
Tank
TankMobility,
Turret rotation and Gun barrel evaluation speed
vs.
Hit taken
50%
( Damaged )
25%
( Badly Damaged )
0%
( Destroyed )
Heavy Tank
1~4
hits taken
5~8
hits taken
9 hits taken
Medium
Tank
1~3
hits taken
4~5
hits taken
6
hits taken
Light Tank
1hit taken
2
hits taken
3
hits taken
Modern
Main Battle Tank
1~4
hits taken
5~8
hits taken
9 hits taken
VSTank
1~3
hits taken
4~5
hits taken
6hits taken
Type of
Tank
Reload Time
Recovery Time
Invulnerability time
Heavy Tank
9 sec.
15 sec.
10 sec.
Medium
Tank
5 sec.
15 sec.
12
sec.
Light Tank
3 sec.
15 sec.
15 sec.
Modern
Main Battle Tank
5 sec.
15 sec.
10 sec.
VSTank
3 sec.
3sec.
12 sec.
Mixer
Mode determines
how the CSC to handle signals from CH1 and CH2 connector
Mixer Mode
Description
1
OFF mode
CH1
controls left track, CH2 controls right track
2
Tank mode
CH1 controls
rudder, CH2
controls throttle.
Proportional,
sharp and pivot turn
Left Track
Right Track
Pivot
Sharp
Proportional
Proportional
Sharp
Pivot
3
Half-Track mode
CH1 controls
rudder, CH2
controls throttle,
Proportional and
sharp turn,
Max. turn
ratio is
configurable, form large (3, Sharp turn )
to small (8)
Left Track
Right Track
Sharp
Proportional
Proportional
Sharp
4
5
6
7
8
Strength
of Recoil
determines strength of tank hull
recoil movement when firing tank gun
Strength of
Recoil
Description
1
Small( 1 ) to Large( 8 )movement
2
3
4
5
6
7
8
Strength
of Jerk
determines
strength tank hull Jerk movement when hit is taken
Strength of Jerk
Description
1
Small( 1 ) to Large( 8 )movement
2
3
4
5
6
7
8
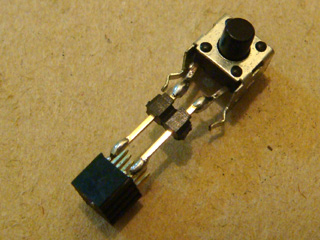
To program CSCII is very easy,
what you need to do is to prepare a SWITCH and some KEYs and
follow some steps listed below.
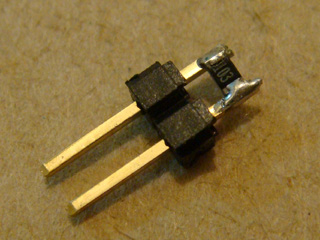
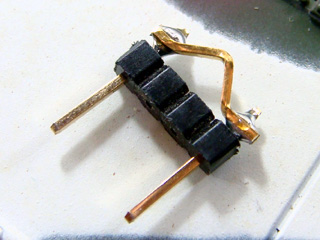
SWITCH is made of
push button switch and 2.54mm pitched pin and used
to tell CSCII that you are going to program new settings,
SWITCH Schematic
KEYs are made of resistor and 2.54mm pitched pin, different KEY use
different resistor.
KEY
1
2
3
4
5
6
7
8
Resistor value
(ohm)
0
680
1.5K
3K
4.7K
7.5K
15K
30K
SETP1: First step of programming
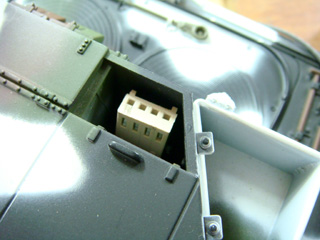
is to connect
SWITCHto DBF
RX( TOP SIDE)of
CSCII,
<PIC>
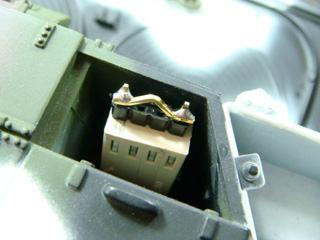
SETP2: Based on your requirement of
application, refer following table to pick right KEY
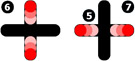
and than insert to CH1, CH2, CH3 or CH5.
<PIC>
For example, if you want to set
CSCII to Light Tank type, pick KEY 3 and insert it to CH1,if you want
to set Mixer of CSCII to Mode 1, pick KEY 1 and insert it to CH2,
KEY
Type of
Tank
(CH1)
Mode of Mixer
(CH2)
Strength
of Recoil
(CH3)
Strength
of Jerk
(CH5)
1
Heavy Tank
1
8
8
2
Medium
Tank
2
7
7
3
Light Tank
3
6
6
4
Modern
Main
Battle Tank
4
5
5
5
VSTank
5
4
4
6
-
6
3
3
7
-
7
2
2
8
-
8
1
1
SETP3: Push SWITCH more than 3
seconds to tell CSCII you want to program it, CSCII will start to reads
KEY
on CH1, CH2, CH3 and CH5, program itself
once valid key are found, flash Red status LED when programming is completed.
SETP4: Restart CSCII by power cycle,
turn off and than turn on power, CSCII will now acts as what you programmed to.
Sometimes, you may want to
restore CSCII with default setting, just remove any KEY on CH1, CH2, CH3 or CH5,
to push SWITCH more than 3
seconds, CSCII will knows and program itself with default setting as below
Key
Type of
Tank
(CH1)
Mode of Mixer
(CH2)
Strength
of Recoil
(CH3)
Strength
of Jerk
(CH5)
None
Heavy Tank
2
2
2
Extended
Tank Personalization
Parameters
of CSCII, can be changed or modified by SONY TV remote, DBF RX is required for
this function
Steps
to set parameters
STEP 1: Insert DBF RX
module( bottom mount or top mount are different),
STEP 2: Short two
contacts on CSCII bye wire or tweezers,
or we add a connector that is accessible outside,
than to short two contacts when setting parameters
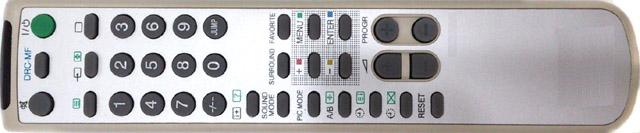
STEP 3: Point SONY TV
remote to DBF RX module,
refer to function table listed below and press the
bottom
of function you want to set,
SONY TV remote
sample
STEP 4: Indicator on DBF
flashes according the setting value.
STEP 5: Open two contacts on CSCII
and switch power off than on
Function tables
Mixer Mode:
Press "MUTE" key on TV remote to select
Available Settings
Indicator flashes times
Description
Mixer Mode
1
1
OFF mode
CH1
controls left track, CH2 controls right track
Mixer Mode
2
2
Tank mode
CH1 controls
rudder, CH2
controls throttle.
Proportional,
sharp and pivot turn
Left Track
Right Track
Pivot
Sharp
Proportional
Proportional
Sharp
Pivot
Mixer Mode
3
3
Half-Track mode
CH1 controls
rudder, CH2
controls throttle,
Proportional and
sharp turn,
Max. turn
ratio is
configurable,
form large (3, Sharp turn )
to small (8)
Left Track
Right Track
Sharp
Proportional
Proportional
Sharp
Mixer Mode
4
4
Mixer Mode
5
5
Mixer Mode
6
6
Mixer Mode
7
7
Mixer Mode
8
8
Store current setting to
PRESET 1: Press number
key "1" on TV remote to store.
Store current setting to
PRESET 2: Press number
key "2" on TV remote to store.
Store current setting to
PRESET 3: Press number
key "3" on TV remote to store.
Use stored PRESET settings:
Press "ENT" Key on TV remote to select
Available Settings
Indicator
flashes times
Description
PRESET 1
1
PRESET 2
2
PRESET 3
3
Preset IR battle data:
Press "MTS" Key on TV remote to select
Available Settings
Indicator
flashes times
Description
TAMIYA Heavy tank
1
Reload Time = 9 seconds,
Invulnerability time = 10 seconds,
Max. hit cam
take = 9 hit.
TAMIYA
Medium tank
2
Reload Time = 5 seconds,
Invulnerability time = 12 seconds,
Max. hit cam
take = 6 hits
TAMIYA
Light tank
3
Reload Time = 3 seconds,
Invulnerability time = 15 seconds,
Max. hit cam
take = 3 hits.
Reserved
4
Reserved
5
VSTank
6
Reload Time = 3 seconds,
Max. hit cam
take = 6 hits,
Tank can not be recovered from destroyed mode.
Reserved
7
Auto Cut-off threshold: base on batter cells and type to
adjust threshold of Auto
Cut-off function,
press "POWER" key
on TV remote to select
Available Settings
Indicator
flashes times
Description
1(Low)
1
3V
2
2
3.3V
3
3
4V
4
4
4.4V
5
5
5V
6
6
5.5V
7
7
6V
8(HIGH)
8
6.6V
Strength of Jerk:
determines
strength tank hull Jerk movement when hit is taken,
press "CH Up" key
on TV remote to select
Available Settings
Indicator
flashes times
Description
1
1
Small( 1 ) to Large( 7 )movement
2
2
3
3
4
4
5
5
6
6
7
7
Strength of
Recoil:
press "VOL UP" key
on TV remote to select
Available Settings
Indicator
flashes times
Description
1
1
Small( 1 ) to Large( 7 )movement
2
2
3
3
4
4
5
5
6
6
7
7
TankMobility:
press "CH down" key
on TV remote to select
Available Settings
Indicator
flashes times
Description
TAMIYA Mode
1
VSTank Mode
2
Armor type:
press number
key "9" on TV remote to select
Available Settings
Indicator
flashes times
Description
Heavy Armor
1
Resistance to machine gun
Light Armor of soft skin
2
No resistance to machine gun
Sending IR code when firing
machine gun:
press number
key "6" on TV remote to select
Available Settings
Indicator
flashes times
Description
No
IR code Sending
1
To send IR code
2
Primary weapon reload time:
press number
key "4" on TV remote to select
Available Settings
Indicator
flashes times
Description
3 seconds
3
4 seconds
4
5 seconds
5
6 seconds
6
7 seconds
7
8 seconds
8
9 seconds
9
10
seconds
10
11 seconds
11
12
seconds
12
13
seconds
13
14
seconds
14
15
seconds
15
Rounds of
Primary weapon:
press number
key "8" on TV remote to select,
Not Supported in TAMIYA version
F/W
Available Settings
Indicator
flashes times
Description
Not
limited
1
TAMIYA 1/16 RC
IR battle rule
8 rounds
2
16 rounds
3
24 rounds
4
32 rounds
5
40 rounds
6
VSTank
48 rounds
7
56 rounds
8
64 rounds
9
72 rounds
10
80 rounds
11
88 rounds
12
96 rounds
13
104 rounds
14
112
rounds
15
120
rounds
16
IR code of
Primary weapon:
press number key "0" on TV
remote to select
Available Settings
Indicator
flashes times
Description
TAMIYA 1/16
1
VSTank
1/24 orTAMIYA 1/35
2
Depends on F/W version
To
repair vehicle
3
damage count decreased by 1 when this IR code
is received
Machine Gun
4
Invulnerability time:
Vehicle is Invulnerable during
this period,
press number
key "7" on TV remote to select
Available Settings
Indicator
flashes times
Description
Vehicle can not be recovered from destroyed mode
1
VSTANK IR battle rule
1 second
2
2 seconds
3
3 seconds
4
4 seconds
5
5 seconds
6
6 seconds
7
7 seconds
8
8 seconds
9
9 seconds
10
10
seconds
11
11
seconds
12
12
seconds
13
13
seconds
14
14
seconds
15
15
seconds
16
Max hit count can take :Press
number key "5" on TV
remote to select
Available Settings
Indicator
flashes times
Description
1 round
1
2 rounds
2
3 rounds
3
4 rounds
4
5 rounds
5
6 rounds
6
7 rounds
7
8 rounds
8
9 rounds
9
10
rounds
10
11
rounds
11
12
rounds
12
13
rounds
14
14
rounds
14
15
rounds
15
Status read out and IR battle test via
SONY TV
Point SONY
TV remote to DBF and press key listed below to show
vehicle status or test IR battle function
KEY on SONY TV remote
Description
Number Key "1"
To repair vehicle,
damage count decreased by 1
Number Key "2"
Fir tank gun to vehicle
Number Key "3"
Fir machine gun to vehicle
Number Key "4"
Number of indicator flash shows remain hit count
can take
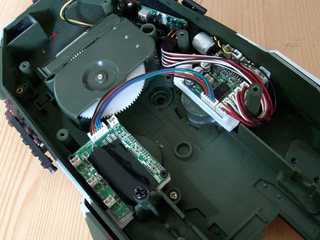
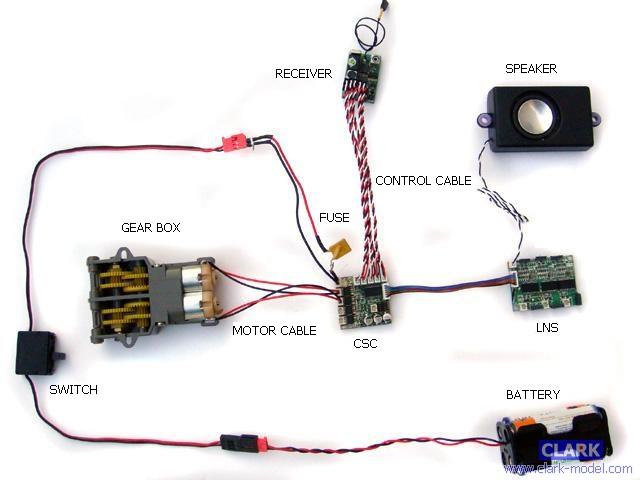
Wiring Diagram
FAQ
Build in
Mixer: Convert Rudder and
Throttlecontrol signalto Left and
Right track speed signal.
Safety shutoff: Occurred if
controlling signal is lost, controller cuts motor off and waits signal come
back, status LED indicator will be lit.
Auto cutoff:
The motor cutoff will
occurred when battery input drops below minimum supply voltage of controller. If
cutoff is happed frequently, increasing battery cell to rise voltage or
use battery which has larger output current.
Remote control system:
There are two remote control system in market, and, CSCII can
support both.
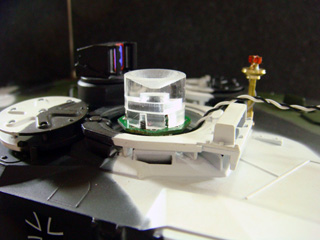
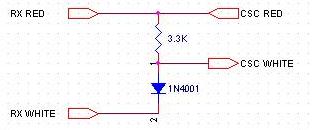
Voltage booster:
Signal level of some receiver may less than 3.3V and can not be
detect by CSCII, we will need a simple circuit as follow to boost voltage by
0.7V.
<RX RED> is power of
receiver( red wire)
<RX WHITE> is PWM signal from
receiver( white wire)
<CSC RED> is power of CSCII( red
wire)
<CSC WHITE> is boosted PWM
signal, connect to CSCII (white wire)
PRECAUTION
For space saving,
ESC have no external housing, please keep Controller form conductor and
metal.
Read
carefully and fully understand the instructions before commencing assembly.
Not designed for 1/16 and larger scale R/C
Tank, please refer to TK series.
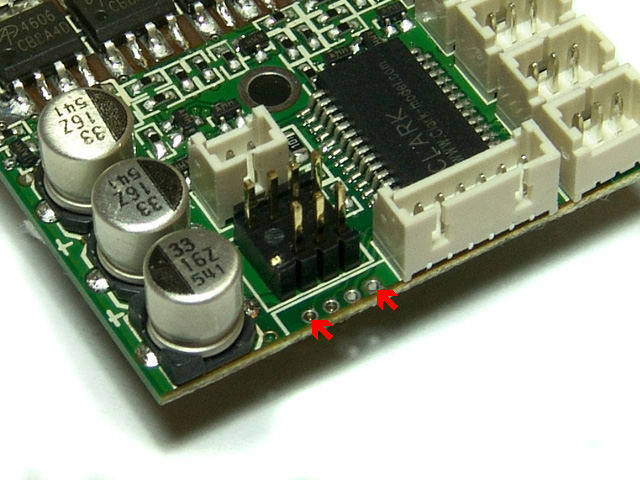
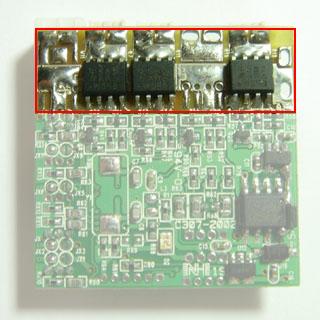
Refer to following pictures, parts circled by red frame are power FET and
regulator,
keep it from any thing for thermal diffusion.